How to take your Measurements Guide!
Taking your own measurements is an essential part of learning how to sew your own clothes. After all we want to make our own clothes so they fit us beautifully!
Many sewing patterns have a measurements guide to help you fit your sewing pattern fit, which you can then alter and adjust as you go through the construction process. In all sewing patterns by The Pattern Stash, this is clearly pointed out within the sewing instructions to help you find the best place to make any adjustments so the pattern fits you as desired!
To start with, there are a few things you should consider when taking your own measurements:
- It's better to have your measurements taken by a friend, this way you can stand up straight and make sure your usual posture is taken into account in places like leg length! Alternatively stand up straight in front of a mirror to help you see better.
- Always use a flexible tape measure to allow it to curve to your natural body shape!
- When taking your measurements, you should stand up tall but relaxed - don't breathe in, stay relaxed and ensure the tape measure is relaxed around you too. You may be tempted to breathe in to make those measurements a little smaller but you'll end up with a garment that's a bit of a squeeze or uncomfortable to wear!
- You should be able to slide a finger in-between your body and the tape measure, this will give you a more comfortable and realistic fit.

Common measurements you will come across include:
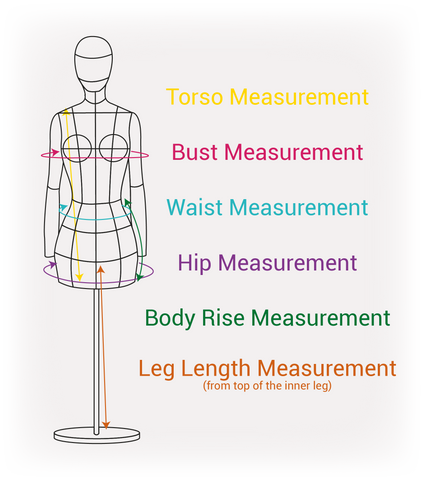
Bust Measurement:
The bust measurement is most accurately taken when wearing the appropriate underwear for the style of garment you are creating. If you plan on wearing a bra with the garment, you should wear a bra when taking your bust measurement.
Place the tape measure under your arms and measure the fullest part of the bust.
Waist Measurement:
The natural waist is the narrowest part of the torso, somewhere near your belly button. It helps to tie a ribbon around the waist to help you find the narrowest part.
Hip Measurement:
The hip measurement is the fullest part of the hip around the top of your bottom. Stand side on to your mirror to find where this is.
Torso Measurement:
When measuring your torso, it's helpful to wear a t-shirt. Place the tape measure on the shoulder seam and pass the tape measure over your bust down towards the hip. Check the finished measurements on the sizing chart to see where the pattern is designed to finish, to help you work out where this will be on your body.
Leg Length:
To measure your leg length, place the tape measure at the top of your inner leg and measure down to the bottom of your ankle.
Alternatively you can use the finished garment measurements from the measurement chart and check the finished leg measurement of yourself from the top of your inside leg.
If you are unsure what leg length to cut, always cut longer so you can shorten this at the fitting stage!
Body Rise:
The body rise is the distance between your waistline and the middle of the crotch seam. It shows you where the finished garment will sit on the waistline.
To measure this, sit down on a flat chair or surface and place the tape measure on your waist and run down to the top of the flat chair.
Finished Length of a garment:
There are a number of ways to find the finished length of a garment. Our favourites include:
- Check the finished length of the garment in the measurements table and measure this on yourself for an idea of where the garment may finish.
- Measure from your waist/hip or inside leg to your desired length and then compare this to the finished measurements in the size chart. This will give you an idea of the size you might want to make and how much you might need to lengthen or shorten the pattern by.
If you are unsure what finished length to cut, always cut longer so you can shorten this at the fitting stage!
Now you have a set of measurements, you can compare these to the sizing chart provided on the pattern.
If you fall in between sizes, we recommend choosing the largest of those sizes and then you know you've got the best foundation to fit your garment. If your feeling confident you could always cut across different sizes on your pattern for example a larger size on the bust tapering down to a smaller size on the waist.
If you cut your fabric bigger than you think is what you'll need, you can always check the fit throughout constructing your pattern!

